WooCommerce Downloadable Product Update Emails
Inform customers when there is an update to their Woocommerce downloadable product via email.
Thank you for purchasing my plugin, I hope it will help you better manage your store!
Table of Contents
About Plugin
This plugin is used to send emails to customers who bought a downloadable product, letting them know that there’s been an update to their download. Never let customers guess if an edition of the e-book they bought has been updated. No more need to manually email customers about downloadable product updates or creating a new product.
Reassurance:
In this document I will try my best to explain how to setup the plugin and how to use it, if you have troubles with any section in this document and you need some help sorting it out then please do not hesitate e-mailing me at [email protected].
Features
-
Html E-mail Support
-
E-mail Variables Support
-
Variable Product Support
-
E-mail Templates
-
E-mail Scheduling
-
E-mail Queue
Installation
There are two ways to install the plugin.
Easiest way:
Go to your WordPress admin Dashboard then go to Plugins->Add new->Upload plugin, an area will drop down and look like this:
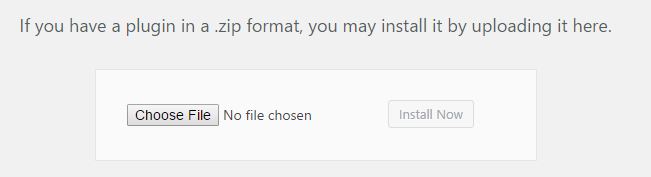
Click “Choose File” and browse to the wcdpue-pro.zip folder and select it. After doing that click “Install Now” and the plugin will install. Then click activate.
Alternate way:
Extract the wcdpue.zip file so it turns into a wcdpue folder with the plugin files inside, then log into your website server via FTP, and then go to where you have WordPress installed on the server and then wp-content/plugins upload the plugin folder to that directory then go back to your WordPress website and go into Plugins and activate the plugin.
If you still have issues with how to install the plugin then please have a look at this video:
Plugin Settings Setup
Setting up the plugin is simple, upon activating it you will be greeted with screen with some buttons:
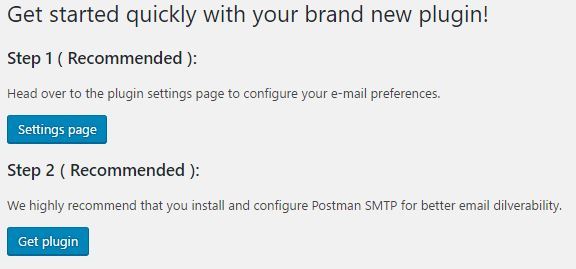
Step 1
By clicking the “Settings page” button which brings you to the configuration of the plugin.
Step 2
Which brings you to the recommended plugin to use for your emails so they send out as example [email protected].
After installing Post SMTP go through the wizard to configure your outgoing mails, you can contact you webhost for the information needed. This is totally optional but without it your emails will be sent as [email protected], this often gets marked as junk/spam so your customers might not see it.
Settings Page
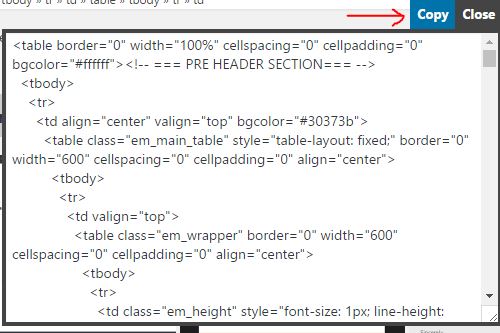
On the plugin settings page enter your subject, email body (it supports the e-mail variables listed below the editor). A template could be selected by clicking the “Templates” bar, this will bring 4 bundled templates into view. Click “Show HTML” to get the HTML code for the template. You could copy manually by highlighting all the code then right click and select “Copy” or you could click the “Copy” button:
Paste the code inside the “Text” section of the editor:
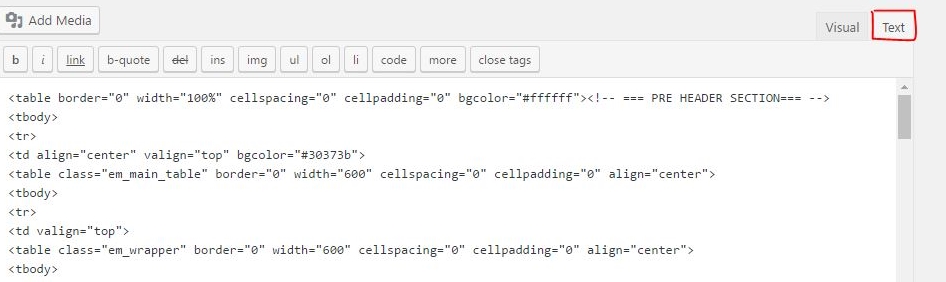
When done switch back to the “Visual” tab to see your template come to life, you could edit the template from the visual section of the editor and add in email variables(they are listed below the editor).

Fill out the rest of the settings to and then click Save Changes at the bottom of the page.
Email bursts:
This means the number of update e-mails the plugin will send out from the scheduled queue each time the cron task runs. On shared servers I recommend keeping this at max 5 some hosts do not allow sending of more than 100 e-mails per hour, so be sure to check if your host to determine the best burst count to set.
Schedule:
Set the interval at which you want queued emails to be set out. This will pick up all available schedules on your website in addition to the one set up by the plugin which is “Every 15 Minutes”, by default the schedule runs daily so be sure to make your choice.
HouseKeeping:
Checking this will delete all the plugin settings if you ever delete it including your email body, subject, scheduled emails etc.
Understanding the Plugin
This plugin only works with WooCommerce downloadable products. It will automatically detect if the product is Variable or Simple and let you update customers who have bought any of those two types of downloadable products.
For use with Simple Downloadable Products
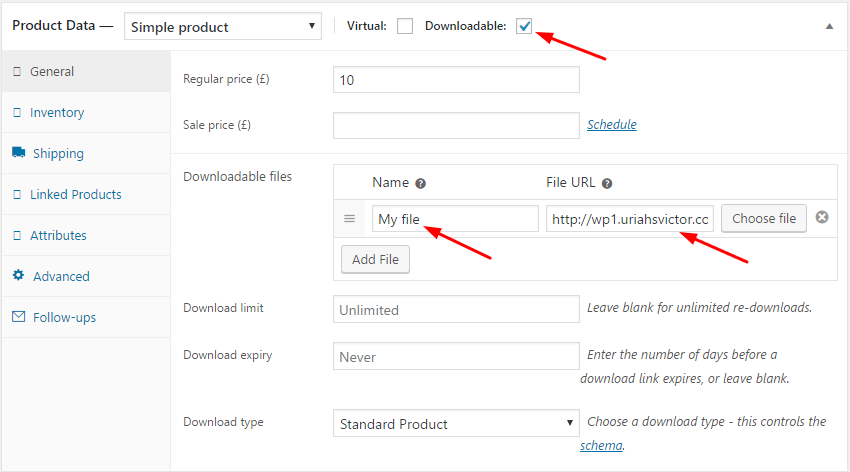
Start by going to your WordPress admin then click Products->Add Product. Add the product name and description then set the product as a downloadable product. After clicking the Downloadable checkbox more options will appear so that you could add in your product name and file (you could click Virtual also if you do not need customers to enter shipping details when purchasing the product), click Add File to start the process of adding your file name and click Choose file to choose the file you want to add for this product:
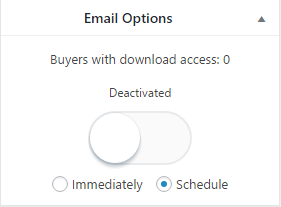 In the screenshot above it shows 0 because this is our freshly created product. The plugin works with already created downloadable products so you do not need to recreate past ones.
For use with Variable Downloadable Products
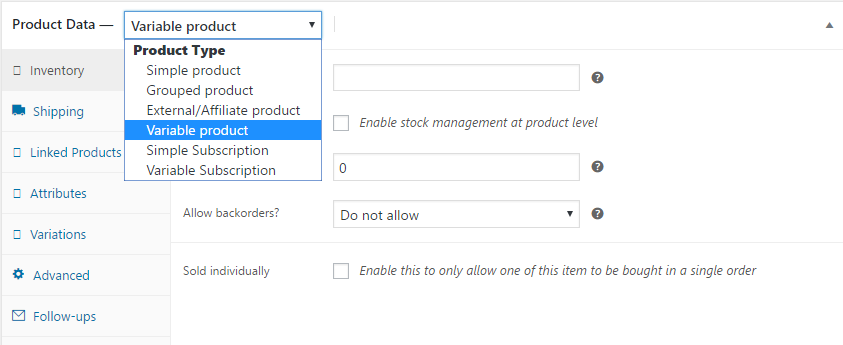
Go through the adding product steps just like before but this time create your variable downloadable product by selecting it from the dropdown list:
After you have added your product attributes and created the variations publish the product and you should see the update options on the right:
Note Well:
The metabox will only show if all the variations of this product are downloadable.
Because this is a variable product the meta box will have checkboxes, more on this later.
Using the Plugin
To use the plugin go to any downloadable product in your products screen on your admin dashboard. It could be a simple downloadable product or a variable one.
The meta box on simple downloadable products will look like this(by default the Immediately option will not be visible but can be turned on in the plugin’s settings):
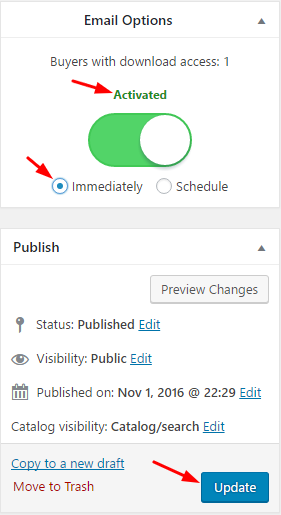
Assuming your product has buyers then you would have the number of buyers showing on the meta box. After changing your product’s downloadable file(and name if you wish) in order to let the plugin know you’d like to send out update e-mails turn the switch to the Activated state by clicking on it:
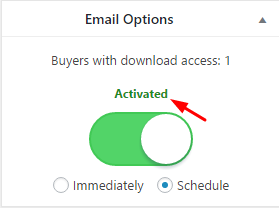
Below the switch you could see there are two radio buttons, one labeled Immediately and the other Schedule.
Immediately – Sends the e-mails immediately after clicking the Update button on the product screen.
Schedule – Schedules the update e-mails to be sent to the buyers at a later time based on the schedule interval you set in the plugin settings screen (see Plugins Settings Setup section above).
Once you have turned the switch to on and selected when you’d like to send the emails simply click update on the product screen:
Note Well:
If your product has more than 10 buyers it’s best to use the schedule option which will send the emails out in batches rather than sending them all at once. If you have a product with 30 buyers and you select the immediately option then depending on your website host and the limitations they put on your website’s server then the operation may timeout.
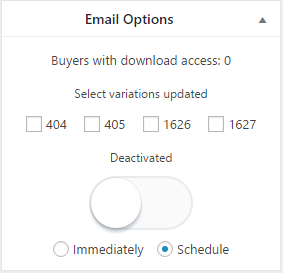
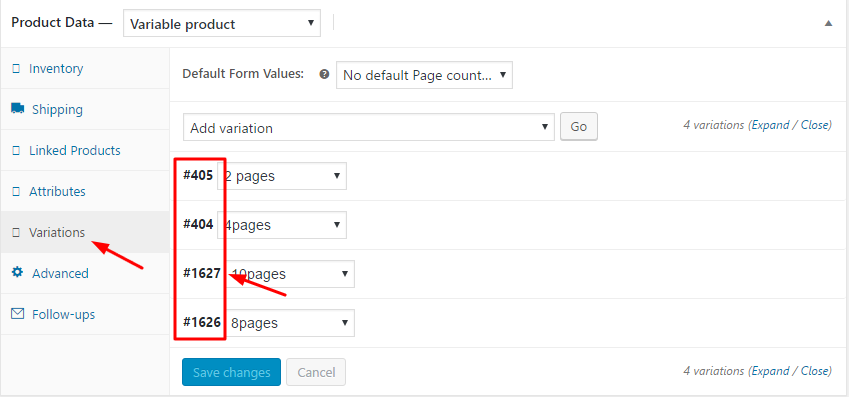
The meta box on variable downloadable products will look like this:
All steps would be the same as before but instead this time also select the variation number which you updated, you could find the variation number in the variations tab of the product data:

Bugs
If you find any bugs with the plugin please send me an email here.
Please leave a rating on CodeCanyon if you like this plugin ♥
Changelog
v1.4.0
-New: Product image magic tag.
-New: Log feature.
-Tweak: Removed immediate update sending feature by default, the option can be turned on in the settings page.
-Tweak: Settings page redesign.
-Fix: wrong link to settings page on the welcome page
v1.3.1
-Fix: Compatible with WooCommerce 3.2
v1.3.0
-New: Clear queue button on settings page
-Fix: Scheduled emails were not being cleared from queue.
v1.2.0
-Fix: Issue where plugin would count duplicate download permissions.
-Tweak: Changed “Buyers with access” text to “Unique download access count”.
-Tweak: Removed {download_url} magic tag.
-Tweak: Removed {download_trim} magic tag.
-Tweak: Plugin will only send 1 email per buyer on product update. Even though a buyer has multiple active download permissions from purchasing the product multiple times; they will only receive one email about the update.
-Tested on WC 3.0
v1.1.0
– New: 2 additional Email variables for direct download link: {download_url} and direct download link without protocol: {download_url_trim}
– New: Subject field now supports email variables.
– New: Setting to use default WooCommerce email styles for emails.
– New: Added admin notice for review.
– New: Plugin shows warning admin notice if WooCommerce is not activated.
– New: Variable downloadable products now show how many buyers each variation has next to the Variation ID
– Tweak: Changed settings page menu title to “WCDPUE Pro”.
– Tweak: Code optimization.
– Fix: Email variables with trim now work on https sites also.
– Info: Tested with WP 4.7
v1.0.0
-Initial release